This is the online help for the advanced build-in "Follow-Cam" configuration.The "Follow-Cam" system is unique in SL vehicles. As there are so many parameters it can seem quite complex to the novice user, but once you understand it, you will enjoy its flexibility.
The Follow-Cam system is accessed using the driving HUD. Once the HUD is synchronized you should have a set of blue buttons on the right. Touch the button with a Camera icon on it. You will be asked permission to attach the "HUD - Follow-Cam" : select 'Yes' and the HUD will be displayed as follows :
To some, the Follow-Cam settings may be a bit confusing. We will try explain it. Basically, think of the basics a floating video camera would need to film you driving your vehicle - as that's what it really is.
The two most important items are the camera's position, and the target's position (the target being what the camera is looking at / filming). Most of the parameters describe these two points, and how they are 'attached'. You can imagine they are attached by a invisible band, so by driving the vehicle, the target is moved (as its attached to the vehicle) and as it moves it drags the camera along too.
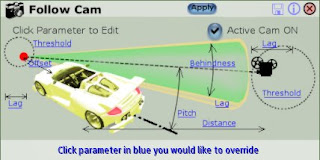
In the HUD image above you can see two circular dotted line areas - these are the camera (on right) and the target zones (on left).
Typically one wants the camera viewpoint to be elevated above the vehicle and a little behind, while the target position should be towards the front of the vehicle. If the target were the centre of the vehicle then you would not see the road ahead - just see the vehicle centre.
Enabling the Follow-Cam system:
The follow cam can be enabled / disabled by checking or unchecking the "Active Cam ON" option on the HUD, and touch 'Apply'. When it is off, the viewpoint moves to a fixed position. Some success in changing the viewpoint can be got by using the SL camera controls - mouse scroll-wheel etc.
We recommend using the follow-cam system. If its too complex for you to setup, you may want to use a saved Follow-Cam Notecard. Use the Setup Ramp to load a Notecard -
click here for assistance with that.
Setting the Target :
NOTE: Settings are inputted by touching the hyperlinked parameter you'd like to change, then typing the new value into chat and pressing ENTER. The setting is only applied to the vehicle when you touch the APPLY button. The entry format is important so please look at the sample communicated to you when you touch the parameter. Most are floating point values entered as : =2.5 but offset is a vector entered as : = < 3.0, 1.0, 0.0 > or =< 3, 1, 0 >
So - to set the target position there is an offset you can specify. This offset is a 3-dimensional offset measured from the centre of the vehicle in meters. As it's 3D it has 3 floating point values : X, Y, and Z, and in SL fashion these are written as a vector, in the format . If you wanted the target at the centre of the vehicle, you would specify <>.
To help the camera move smoothly, the target has a threshold. Think of this as a spherical area around the target position. Any movement of the vehicle moves the target (as they are tied together by the offset parameter) ... but as long as the target stays within the threshold (sphere) the camera is not affected. This helps prevent small movements shake the camera target.
When the vehicle and target do move outside of the threshold (sphere), the movement is then translated to the follow-cam. However, vehicles such as motorcars have rapid acceleration and collisions, so to help the follow-cam system absorb some of the rapid movements there are Lags. Any SL user will be familiar with lag ... but its essentially the time taken for something to catch up. So when the target moves 10m, a target Lag of 0.2s will give the system 1/5th of a second to correct its position. This further smoothes the movement. The lag can therefore be adjusted and is measured in seconds taken to catch up.
Setting the Camera:
The camera gets dragged behind the vehicle always pointing at the target point.
The position of the camera is described by the Distance in meters from the vehicle centre to the camera, as well as the Pitch angle (incidence) in degrees that the camera is elevated.
As the vehicle target position moves, the camera gets dragged behind. When the vehicle turns, the camera tries to follow to keep behind. To prevent small turns jolting the camera from side to side, there is a Behindness angle in degrees and Lag in seconds. The behindness angle allows the camera to not swing as long as the desired camera position falls within that angle, and when the camera does need to swing the Lag tells it how long it has to move to the new position.
Additionally, and similar to the target, the camera also has a Threshold and Lag. This allows you to specify an invisible sphere for the camera of radius in meters, and as long as the desired camera position falls withing that sphere the camera will not move. Again when it does need to move the lag allows it a certain time in seconds to move to the new position. These lags need not be long - they can be 0.2 sec etc.
Saving and Loading Follow-Cam settings
Once you have found settings you like, it is recommended you save them to a Note Card so you can use them in other cars you may take from the package etc. You may also give a copy of the Notecard to a friend so they can try your settings.
To save the settings, touch the small diskette icon on the HUD (Í). As SL does not allow the scripted creation of notecards, the settings will be chatted to you (only you). Copy these settings and paste them into a new Notecard. Name the notecard appropriately and save it in a folder in your inventory.
When you want to reload the settings, use the Setup Ramp to load the Notecard -
instructions here.
Most of all...
Enjoy!


