This Website has moved to a new home !
Please click here and we suggest to make it a favorite :
http://zamotors.visiwa.com
Tuesday 23 November 2010
Sunday 26 September 2010
Camera GT 2 Owners Handbook
This is the updated handbook for the Camera GT2. The previous Handbook for version 1.32 can be found here.
Click on any of the links below for assistance:
General Camera GT 2 information
Click here for Camera GT 2 Release Notes
Click here for Camera GT 2 HUD Release Notes
Click here for Keyboard Controls and Driving tips
Color / Tint / Customization assistance here
Assistance for Setup Ramp here
Frequently Asked Questions (FAQ) here
Sunday 11 April 2010
Delete Scripts / Lock / Burn Customization
This option is designed for purists to reduce script overhead by reduce the "eye-candy" scripts in the motorcar.
The idea is that you would customize the car as you like it, then run the DelScript option (available as a menu option from the ZA Setup Ramp) to reduce the number of scripts in the drivable motorcar.
A number of scripts are removed, mostly to do with color/customization, some pose scripts, and some animation scripts.
Saturday 10 April 2010
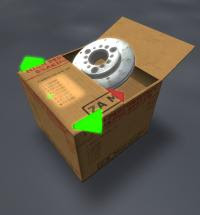
Assistance For ZA Setup Ramp
The ZA "Setup Ramp" is a new feature available from version 2.0 of the Camera GT. It's a visual and fun tool to assist owners in overriding and tweaking of their motorcar.


To get the "Setup Ramp", you need to be wearing the Driving HUD and seated as a driver in the car. The HUD needs to be 'synchronized' (connected) with the car. Simply click the Setup Button ( @ ) and the ramp should load under the car.

If it does not load, then the most likely reason is the property you are on does not allow scripts and/or object to be rezzed. Simply move to a parcel which does and retry.
Once the ramp loads the car physics will be disabled - so you cannot fall off the ramp, and you will be able to make use of all the setup tools to override the parameters on your car.
The Ramp has a few overriders included. These are used to override parameters on the vehicle. In all cases, adjustments are applied to the vehicle instantly. In SL physics there is limited ability to script the complex performance conditions of vehicles, but we manage to get some effect.
The following is a brief summary of each item :
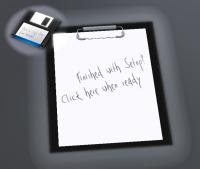
Clipboard and Diskette
The Clipboard is used to complete the setup options. Click the Clipboard to bring up a menu.
Menu options are :
Help/Info : Gives you a link to this page
IM Settings : Allows you to have the current settings IM'd to you (will appear in your Chat window). You can copy these settings and save them to a NoteCard file which you should name appropriately. You can use that Notecard file to quickly load the same settings at a later date.
Tip : These Notecards can also be transferred to other users to setup their vehicle with the same setup.
DelScript : This utility is for purists who would liek to reduce the scripts in the vehicle to improve region performance. More info here.
Finished : Select this option once you are done with the setup. The ramp will be removed and physics re-enabled so you can enjoy driving your vehicle.
The Diskette is used to LOAD (restore) settings from a previously saved notecard. When you touch the diskette a Document Scanner will be rezzed nearby.
Hold in CTRL key and drag and drop a Notecard containing settings from your inventory onto the scanner. Once it recognises the document, confirm you wish to load the settings by touching the scanner.
Once you do that, the setting should be uploaded into your vehicle, and you should get a confirmation message.
Note: The scanner is only displayed for about 1 minute. If it disappears before you have a chance to drag the Notecard, simply touch the diskette again for another.

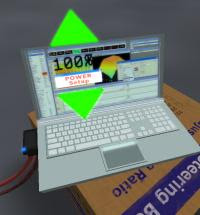
POWER Setup
The Power is setup by overriding the on-board CPU using a laptop.
You can adjust the Power override between 30% and 200% of standard Power.
Use the large green 3D arrows to adjust the Power up or down.
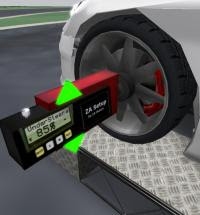
Braking Override
More important than Power is the Braking Power. Use this tool to override the Braking ability of the vehicle by replacing the Brake Disc system.
Some drivers prefer a slower braking effect as they also brake using the gears, while others prefer sharper braking.
Touch the large green 3D arrows to adjust the grade of brakes used in your setup - up to CM280 (ultimate) braking power.
Steering Ratio
Our steering system always has been more advanced than most SL vehicles. We've always had dynamically progressive steering (which changes the steering ratio depending on speed), as well as high speed digital (bump) steering - so you don't roll your car at high speeds when you just want to make a slight directional change.
We also allowed 'tweaking' of the steering ratio previously, but now we also allow overriding of under/oversteer effect (see next item).
This steering ratio adjustment is similar to our previous steering 'tweaking' (with a bit more scale), and allows you to override the normal steering effect between 'Lazy' (32:1 Steering ratio) and Ultra Fast (10:1) by replacing the Steering-box ... actually you can go down to 8:1 - but that's really tight.
UnderSteer / OverSteer
We now allow adjustment of Under / Oversteer effect.
Understeer is the effect whereby a vehicles cornering path radius is greater than the radius indicated by its wheel direction ... ie - the front wheels have the effect of 'slipping' and the vehicle tends to take the corner wider than it should. Oversteer is the opposite - where the back-end tends to 'swing-out' around the corner.
Using the large green 3D arrows you can adjust More Oversteer (up) or more Understeer (down) by adjusting alignment.
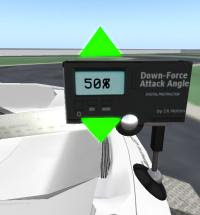
Down-Force Override
We have the ability to override the effective down-force (DF) on the vehicle.
To illustrate this with a modifier, we have an instrument changing the apparent aerodynamic attack angle of the rear-wing.
Increase the % factor for more downforce, and decrease for less. Note that a lot of downforce may have a small effect on the top-end speed of the vehicle (as there's an aerodynamic loss as well as more rolling resistance).
Enjoy
Zab
Tuesday 29 December 2009
Massive GT Update Lurking...
(copied over from ZA Motors blog)
I have tried to get this out as a Christmas to all my GREAT customers - just to say thanks for your support, but it's just too much to complete.
Plus we are releasing a new car around the same time - want a hint - its called "Zender" at the moment :)) ... inspired by Pagani ;)
BTW : Those of you who cannot afford the L$6995 price tag of the GT - there is a cheaper (GS) version for sale at L$2300 here. Its very similar to the original GT, small script differences, it has some additional poses on windshield etc, it is limited in colors (just over 30 presets instead of millions), and only has the supplied interior and alloys. But if you are just looking for a decent car, then its there.
FYI : We have a Christmas tree running at the moment GIVING FREE GS's AWAY !!! :)) ... all you need is some patience and have a good chance to win one by just spending some time on our sim. Its here - just click the tree to enter, then enjoy shopping / exploring the sim.
So back to the update. Without giving too much detail away .... I really appreciate all you great customers and your support, and I didn't want to be like other car-makers - just push new cars nonstop and give no extra value on older ones. So I've been working on something special to re-ignite your GT's ;))
NOTE: This update is GT only, not GS.
As many of you commented, the GT was pretty decent and ahead for its time. It's now 18 months later and some makers are catching up, and their sculpt meshes are a little less shaky than they used to be. So this update will take your GT a big step ahead again. It will not appeal to ALL owners, but I would think most will enjoy it. I will also be making some small changes on sculpt improvements on the base GT model in the update so I'm sure all will enjoy those.
Have fun
Zab
Saturday 31 May 2008
Ohhhh ... which color today ???
Pretty soon, this is the dilemma owners will be facing...
Our upcoming update, which was going to be a small one, is going to be a big one. Unfortunately it has meant a slight delay of a week or so to cram it all in and test, and all going well we hope to release the update in a week from today or slightly sooner. Watch this blog for the release notice as well as notices will be posted to the ZA Motors group - join it if you are an owner, its zero-spam and very few notices so won't bug.
As an appetizer, I am including a picture put together by the great and ever helpful Lucie Laval who does some testing for me. When I asked her to test the color configurator, this is what she came up with :) ...

Just Love it! Well done Lucie! Her words were ... 'just tell me what color you want, I can make any color'.
FYI : Those who voted on the color poll - your votes were put to good use. I added 'base' colors to the car in that priority : White (original), Charcoal (Black), Red (Pure), Silver (70%).
But then I had promised many ladies pink, and they all love different shades of pink ... so I added a tint function. Using the 4 base colors mentioned as well as tints on top of those means you can color just about any color you can think of.
Thats not all ... I thought in order to give owners even more flexibility and the ability to really personalize their ride, I added the option to be able to set color by panel. So you can have pink doors, red main body, green bonnet, black engine cover, silver wing ... if you really like (and hate your neighbor) :)
Oh, and then I threw in shiny options too :) ... but take note ... shiny does not work on panels with transparency (its an SL known issue hopefully they'll one-day fix) - like the windscreen frame and engine cover ... so on those panels you can fiddle a bit with the tint to get it closer. Also while chrome looks cool ... remember it will make small sculpt bumps look massive so be careful if you use it ... personally I prefer mat (no shine) or Low.
All this functionality in the color configurator means it loads and unloads a bit slow (via the new "CFG.." button on the HUD), but as its not something you use all the time, I guess thats acceptable for the flexibility.
Oh, and I threw in a few more goodies too ... but I'm keeping them to myself :) .... hint: N71 Aeon found one ... its on his blog review at http://n71aeon.blogspot.com/2008/05/talk-of-town.html if you can't wait ... nice review, thx N71. Its really inspiring to hear there are so many happy and proud owners.
Saturday 24 May 2008
Assistance for Color / Tint Configuration
This is the on-line help assistance available for the Color / Tint Configuration HUD, which allows you to color and/or tint either your entire Camera GT, or specific parts of it. So you could color various parts separately if you like.
To load the Color / Tint Configuration HUD, you need to be wearing the Camera GT Dash HUD and have it synchronized to the Camera GT car you would like to color. Click on the Color button, and you will asked if its OK to attach the HUD - Color Configurator to your avatar. You should select the Yes button. You will then see the Color / Tint Configuration HUD as displayed below.
If it does not load, be sure to check your Camera GT Dash HUD is properly synchronized to the car. To be sure you could stand up, wait a few seconds then resit and give it a few seconds to synchronize.

To color the car, simply select the body-part / panel to color - which can be 'All body panels', or one of the specific panels, then select a base color to use, optionally a tint to apply over the base color, a Level of Shine, and click Apply button to see your car change in real-time.
Additionally you can select from 3 custom Interior finishes, as well as from 3 sets of Alloy rims.
Color settings are not saved between cars nor can they be. So if you rez a new car from your package, it will have default settings.
NOTE on Shine : I have included level of shine for further customization. Be aware though that shiny sculpts can look bumpier than non-shiny ones, so I recommend a NONE or LOW shiny setting. Also be aware that you cannot set shiny on any panels that have transparency ... for example the rear engine hood, and the windscreen. So when you apply shiny setting to your car these panels may look different. Often you can hide it by tinting those panels a little differently - you need to experiment.
NOTE: There is a 'graphite' finish on the bonnet and rear wing upon delivery. These are further customizations which you cannot revert to once changed. If you wish to use them later the only way is by extracting a new car from your package then don't recolor those panels.
Saturday 10 May 2008
Assistance For Follow Cam Configuration
This is the online help for the advanced build-in "Follow-Cam" configuration.
The Follow-Cam system is accessed using the driving HUD. Once the HUD is synchronized you should have a set of blue buttons on the right. Touch the button with a Camera icon on it. You will be asked permission to attach the "HUD - Follow-Cam" : select 'Yes' and the HUD will be displayed as follows :
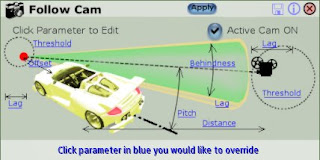
The "Follow-Cam" system is unique in SL vehicles. As there are so many parameters it can seem quite complex to the novice user, but once you understand it, you will enjoy its flexibility.

To some, the Follow-Cam settings may be a bit confusing. We will try explain it. Basically, think of the basics a floating video camera would need to film you driving your vehicle - as that's what it really is.
The two most important items are the camera's position, and the target's position (the target being what the camera is looking at / filming). Most of the parameters describe these two points, and how they are 'attached'. You can imagine they are attached by a invisible band, so by driving the vehicle, the target is moved (as its attached to the vehicle) and as it moves it drags the camera along too.
In the HUD image above you can see two circular dotted line areas - these are the camera (on right) and the target zones (on left).
Typically one wants the camera viewpoint to be elevated above the vehicle and a little behind, while the target position should be towards the front of the vehicle. If the target were the centre of the vehicle then you would not see the road ahead - just see the vehicle centre.
Enabling the Follow-Cam system:
The follow cam can be enabled / disabled by checking or unchecking the "Active Cam ON" option on the HUD, and touch 'Apply'. When it is off, the viewpoint moves to a fixed position. Some success in changing the viewpoint can be got by using the SL camera controls - mouse scroll-wheel etc.
We recommend using the follow-cam system. If its too complex for you to setup, you may want to use a saved Follow-Cam Notecard. Use the Setup Ramp to load a Notecard - click here for assistance with that.
Setting the Target :
NOTE: Settings are inputted by touching the hyperlinked parameter you'd like to change, then typing the new value into chat and pressing ENTER. The setting is only applied to the vehicle when you touch the APPLY button. The entry format is important so please look at the sample communicated to you when you touch the parameter. Most are floating point values entered as : =2.5 but offset is a vector entered as : = < 3.0, 1.0, 0.0 > or =< 3, 1, 0 >
So - to set the target position there is an offset you can specify. This offset is a 3-dimensional offset measured from the centre of the vehicle in meters. As it's 3D it has 3 floating point values : X, Y, and Z, and in SL fashion these are written as a vector, in the format . If you wanted the target at the centre of the vehicle, you would specify <>.
To help the camera move smoothly, the target has a threshold. Think of this as a spherical area around the target position. Any movement of the vehicle moves the target (as they are tied together by the offset parameter) ... but as long as the target stays within the threshold (sphere) the camera is not affected. This helps prevent small movements shake the camera target.
When the vehicle and target do move outside of the threshold (sphere), the movement is then translated to the follow-cam. However, vehicles such as motorcars have rapid acceleration and collisions, so to help the follow-cam system absorb some of the rapid movements there are Lags. Any SL user will be familiar with lag ... but its essentially the time taken for something to catch up. So when the target moves 10m, a target Lag of 0.2s will give the system 1/5th of a second to correct its position. This further smoothes the movement. The lag can therefore be adjusted and is measured in seconds taken to catch up.
Setting the Camera:
The camera gets dragged behind the vehicle always pointing at the target point.
The position of the camera is described by the Distance in meters from the vehicle centre to the camera, as well as the Pitch angle (incidence) in degrees that the camera is elevated.
As the vehicle target position moves, the camera gets dragged behind. When the vehicle turns, the camera tries to follow to keep behind. To prevent small turns jolting the camera from side to side, there is a Behindness angle in degrees and Lag in seconds. The behindness angle allows the camera to not swing as long as the desired camera position falls within that angle, and when the camera does need to swing the Lag tells it how long it has to move to the new position.
Additionally, and similar to the target, the camera also has a Threshold and Lag. This allows you to specify an invisible sphere for the camera of radius in meters, and as long as the desired camera position falls withing that sphere the camera will not move. Again when it does need to move the lag allows it a certain time in seconds to move to the new position. These lags need not be long - they can be 0.2 sec etc.
Saving and Loading Follow-Cam settings
Once you have found settings you like, it is recommended you save them to a Note Card so you can use them in other cars you may take from the package etc. You may also give a copy of the Notecard to a friend so they can try your settings.
To save the settings, touch the small diskette icon on the HUD (Í). As SL does not allow the scripted creation of notecards, the settings will be chatted to you (only you). Copy these settings and paste them into a new Notecard. Name the notecard appropriately and save it in a folder in your inventory.
When you want to reload the settings, use the Setup Ramp to load the Notecard - instructions here.
Most of all...
Enjoy!
Thursday 24 April 2008
General Camera GT Information
This Second Life Camera GT model is inspired by the amazing Porsche Carrera GT - A limited production Porsche build from 2004 - 2006 with only 1270 produced, and nominated the fastest car in the world in 2005.
While the real-thing is way out of most peoples budget, we hoped that (and are finding that) a much wider variety of enthusiasts get to enjoy the SL version.
Porsche Carrera GT
Performance :
While the real-thing is way out of most peoples budget, we hoped that (and are finding that) a much wider variety of enthusiasts get to enjoy the SL version.
Porsche Carrera GT
Performance :
| 0-60 mph | 3.6 seconds | ||||
|---|---|---|---|---|---|
| 0-100 mph | 6.8 seconds | ||||
| 0-125 mph | 9.9 seconds | ||||
| Max Speed | 334 km/h (207 mph) |
Sunday 20 April 2008
Carrera GT RELEASED !!!
As promised to excited fans, the Carrera GT was released on the SL grid on evening of Sunday 20th April 2008.
It is available NOW for purchase in-world at the vendor ONLY at our shop (click here for TP).
Customers will receive FREE updates automatically as soon as they are released. At release it's only available in Pearl White, but later updates will include a user-selectable color pack.
NOTE that this is a early release model and still has a few small bugs to resolve. These will be automatically pushed to customers using our advanced update server technology.
Thanks to all the customers / fans / friends for all their support (and patience) in getting this out.
Enjoy :)
Sunday 13 April 2008
Camera GT Controls
This is a short description of the Camera Driving controls.
Camera GT overall package Release Notes are here
Camera GT HUD Release Notes are here
As with all SL vehicles the Camera GT is driven using the keyboard. The main keys used are the four arrow keys, and the PageUp and PageDown keys.
================================
1. KEYBOARD CONTROLS
================================
 Left and Right arrows steer the car.
Up arrow key accelerates.
Down arrow key decelerates / brakes, or if stopped reverses the car.
PageUp key changes gears up (eg 1st -> 2nd gear)
PageDown key changes gear down (eg. 2nd->1st gear)
M key : 'M' key goes into Mouselook. in mouselook you are viewing the world from your AV's eyes. Use the mouse to look around (turn your head). Currently the way to drive is move your mouse till you look ahead, then use the keyboard as usual to drive the vehicle. Press ESC to exit mouselook. We may enhance mouselook later to steer the car by mouse.
================================
2. KEYBOARD USAGE
================================
Driving styles differ, but it seems most SL race drivers use the gears as a type of brake. This frees up some fingers.
For arrow control, they typically (right-handed use) would keep the Up arrow depressed to keep power on (using their middle-finger), and use the index (pointer) finger hovering over the left arrow, and ring finger hovering over the right arrow. They can press either left or right arrow at anytime to make small directional changes while still keeping power on.
The same middle finger can be used to apply brakes by leaving the up arrow and pressing the down arrow.
While this is going on, they need to change gears. Typically they could do that with the left hand stretched over the keyboard - middle finger hovering over the PageUp key, and index (point) finger hovering over the PageDn arrow. As I mentioned they often use gears as a braking mechanism, so sometimes instead of applying brakes, they might change down from 5th to say 3rd gear as they approach a corner. This reduces the vehicle power and slows it down.
Enjoy :))
Camera GT overall package Release Notes are here
Camera GT HUD Release Notes are here
As with all SL vehicles the Camera GT is driven using the keyboard. The main keys used are the four arrow keys, and the PageUp and PageDown keys.
================================
1. KEYBOARD CONTROLS
================================
Up arrow key accelerates.
Down arrow key decelerates / brakes, or if stopped reverses the car.
PageUp key changes gears up (eg 1st -> 2nd gear)
PageDown key changes gear down (eg. 2nd->1st gear)
M key : 'M' key goes into Mouselook. in mouselook you are viewing the world from your AV's eyes. Use the mouse to look around (turn your head). Currently the way to drive is move your mouse till you look ahead, then use the keyboard as usual to drive the vehicle. Press ESC to exit mouselook. We may enhance mouselook later to steer the car by mouse.
================================
2. KEYBOARD USAGE
================================
Driving styles differ, but it seems most SL race drivers use the gears as a type of brake. This frees up some fingers.
For arrow control, they typically (right-handed use) would keep the Up arrow depressed to keep power on (using their middle-finger), and use the index (pointer) finger hovering over the left arrow, and ring finger hovering over the right arrow. They can press either left or right arrow at anytime to make small directional changes while still keeping power on.
The same middle finger can be used to apply brakes by leaving the up arrow and pressing the down arrow.
While this is going on, they need to change gears. Typically they could do that with the left hand stretched over the keyboard - middle finger hovering over the PageUp key, and index (point) finger hovering over the PageDn arrow. As I mentioned they often use gears as a braking mechanism, so sometimes instead of applying brakes, they might change down from 5th to say 3rd gear as they approach a corner. This reduces the vehicle power and slows it down.
Enjoy :))
Camera GT Owners Handbook
We hope you are enjoying your Camera GT.
Click on any of the links below for assistance:
General Camera GT model information
Click here for Camera GT Package Release Notes
Click here for Camera GT HUD Release Notes
Click here for Keyboard Controls and Driving tips
Color / Tint / Customization assistance here
Frequently Asked Questions (FAQ) here
Thursday 10 April 2008
Glowing driving / brake lights ...
SL has just announced a new client version 1.20 in RC (Release Candidate). One of the cool features it introduces is 'scriptable glow'.
At a recent test track conversation with some other car developers they said they are looking forward to that. I told them I've been using it on the Carrera GT for two weeks already which they laughed at, so I showed them, and they all viewed it too - in their standard SL 1.19.1(4) etc. I guess it's true as they say ... he who laughs last, laughs best :)
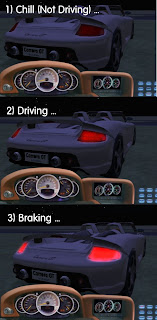 So for the rest that are waiting for scriptable glow, it's already available if you know how to get at it ... alongside are the 3 pics of it in action on the Carrera GT :
Click on pic for a closer view
At a recent test track conversation with some other car developers they said they are looking forward to that. I told them I've been using it on the Carrera GT for two weeks already which they laughed at, so I showed them, and they all viewed it too - in their standard SL 1.19.1(4) etc. I guess it's true as they say ... he who laughs last, laughs best :)
 So for the rest that are waiting for scriptable glow, it's already available if you know how to get at it ... alongside are the 3 pics of it in action on the Carrera GT :
- Chilling (not driving - relaxing in car) = only sunlight/moonlight glow
- Normal Driving = lights on glow
- Under Braking = high glow
Click on pic for a closer view
FAQ
When will this car be released in Second Life?
It was released on Sunday 20th April 2008.
The latest update is ver 1.1 released on 16 June 2008.
Where can I get it ?
You can purchase a copy at the ZA Motors shop at MO Island - click here for a link. ZA Motors website is here. ZA Motors will be the ONLY supplier of this car. Do not buy your car from anyone else without first confirming with us it is a valid licensed vehicle, as it'll possibly be a copy - in which case we'll be DCMA'ing and suing the copier, and you will lose the vehicle as soon as we have LL delete the copied assets.
You can also purchase a copy of the Camera GT on-line at SLExchange.com here, or OnRez.com here. Both of these options can also be used if you wish to purchase it as a gift.
How do I get an Upgrade?
ZA Motors has a special upgrade server. This server will push updates to you as soon as we release them. In order to check for an update, all you need to do is rez the Camera GT Package (The key-holder) in SL. As soon as it rezzes, the update server will check it to see if it needs to be upgraded. If so, you will be notified by a message that you have been given an object byt the ZA Motors Upgrade Server. You should accept / Keep that upgrade and use it instead of the old one. Once you have confirmed the new one is working, you should delete the old package from you inventory - to prevent you re-using it and getting a new upgrade issued all the time.
The HUD does not connect when removed and re-attached while I am sitting in the vehicle.
This is a known bug, its unfortunately due to some issues in LSL. The workaround is simple : just stand up, then sit again and the HUD will auto-connect as soon as you wear it.
The HUD stops working when I drive.
It may have lost its communication with the car. Stand up, and re-seat yourself and give it a few seconds - it should re-synch and display the correct gear. If that does not work, try remove that HUD and take a new HUD copy from the Package, wear that, and sit down.
The sound stops while driving or is a wrong sound
As from the update this would be unusual. But as sound is spooled to the SL client its possible one of the sound files never got downloaded. If you just stop the car moving it should reset. If that doesn't help, try stand and re-seat yourself and wait a minute before driving to allow them to download.
There is no light beam, or smoke when I drive
The Effects (FX button on HUD) needs to be enabled to get certain effects. Switch it on, or try toggle it off then on.
How can I disable REAL-Damage and the REAL-Light light-beams ?
REAL-Damage and REAL-Lights are controlled by the FX button on the HUD, so they can both be enabled or disabled, but together not separately.
When I sit in the car I do not drive but end up in passenger seat
It is a little confusing if you are not aware of it, but this is due to the passenger-sitting script we have on the seat. The driver should NOT right-click on the seat to drive, the driver should right-click on the CAR BODY - for example the rollbar hoops behind the seats, then select drive.
Only the passenger should click on the seats to drive with.
How do i color/tint/customize my car ?
You need to be seated as the driver with your HUD synchronized, then simply click the Color button on the HUD. This will rez a new Color/Tint HUD and you will be asked if it can be attached - you should select yes. Use the controls in that HUD to customize your car. See here for color / tint assistance.
How can I save my customized car correctly?
The customized options work on the state of the current car. This has advantages and disadvantages.
- The main disadvantage is if you rez a new car (eg from the Package) it will rez with default coloring - as delivered - not your customization.
- The main advantage is you can customize a few different cars and while you may not be able to rename them to list the color in your inventory, you could create folders where the folder is called eg: "Camera GT - Matt Black", then save a copy of the car in it.
The key thing to remember when you want to save a customized car is to remember to save it in a non-driving state (else all the running sounds etc are saved with it).
So the best way to go about this is :
1) Rez a new car from the Package (I suggest you use the package as then you are sure its in a zero state)
2) Wear your HUD.
3) Select 'Drive' to drive the car, but don't drive it at all - just sit in it.
4) Once the HUD has synchronized, click the Color button and load the Color / Tint HUD
5) Customize the car as you like until you are happy with it
6) Now STAND UP. Then wait a few seconds (perhaps 30 or so) to allow all driving functions to stop (lights must go off, engine noise stop etc)
7) Now, either TAKE A COPY of the car to your inventory. At this time you might want to create a custom named folder describing your customization and save it in there (as explained above)
8) Drag the car out from the custom folder and make sure its good. If not, try redo 4 - 7 just wait longer.
9 ) Enjoy :)
Friday 21 March 2008
Camera GT HUD Release Notes
Camera GT HUD Release Notes
Version 1.1
Designed and Developed by IAm Zabelin
© 2008 ZA Motors
WELCOME
Welcome to Version 1.1 of the HUD.
Definition : HUD = Heads Up Display
This notecard contains the following sections:
1. WHERE DO I GET THE HUD?
How to get a copy
2. HOW DOES IT WORK?
Basic HUD instructions
3. KNOWN ISSUES / BUGS
Some existing issues we are aware of and are working on.
===================================
1. WHERE DO I GET THE HUD?
===================================
To get a copy of the HUD, rez (create) your Camera GT Package on the ground, then left-click on it to get the menu, then select "Get HUD".
The HUD automatically tries to attach to your screen, so you will get a message asking if you'd like the Camera GT Dash HUD to attach to your avatar. You should select YES. You will then see the HUD attached to bottom left corner of your screen.
===================================
2. HOW DOES IT WORK?
===================================
Once the HUD is attached to your screen, and you sit as driver in the Camera car, it will automatically connect. It will take a few seconds to do so, as parameters are read from the car and buttons updates on the HUD and vica-versa. You will see a message in chat 'Camera GT Dash HUD: HUD Synching ...' which tells you it is busy setting up communications on a safe channel with the car.
FYI : When the HUD communicates with the car, you will see a flashing blue lamp under the instruments on the HUD.
Once the HUD has synchronized fully, you will get a message in chat 'Camera GT Dash HUD: HUD Ready'. Also once it has synchronized the gear display will change to '1' .
For older users reference, there is no longer a 'Chill' mode in the car as from version 1.0
LAYOUT
The HUD layout is pretty self-explanatory : it has a dashboard shape with working Speedometer, Rev-counter, and Gear-display. There are HUD buttons to control car options on the right, and on far left is an 'i' button to open the on-line owners-handbook.
Below is a brief explanation of the buttons :
i - Opens the on-line owners-handbook

===================================
3. KNOWN ISSUES / BUGS
===================================
Known issues:
- Camera sometimes does not switch over correct. This seems to be due to the way SL is coded. If this happens try reselect the camera, or first click elsewhere on the SL window in-world. If that doesn't help, try zoom your camera holding SHIFT + CTRL + mouse while left mouse button is in, then retry the camera.
- To prevent lag, menu's are scripted to timeout if you don't use them in a reasonable time. If that happens, just try again when you are ready.
Enjoy :)
Enjoy :)
Wednesday 19 March 2008
Carrera GT Package Release Notes
Carrera GT Package
Version 1.1
Designed and Developed by IAm Zabelin
© 2008 ZA Motors
WELCOME
Congratulations on your purchase of the "Carrera GT" - inspired Camera GT model. We trust that you will enjoy it immensely.
For those updating from a previous version, you can jump to section 5 which lists the changes in this release.
This model has a lot of functionality packed into it so please familiarize yourself with it first by reading through the notecards. There are 3 : this one - the Package (also known as the Keystand) release notes, then there's the Camera GT Release notes with more car specific details, and also a HUD Release Notes for HUD details.
This notecard contains the following sections:
1. WHERE IS MY CAMERA GT?
Explains how it is all packaged and how to use it all.
2. WHY A KEYSTAND AND WHATS SO INTELLIGENT ABOUT IT
The reason we use a keystand
3. UNPACKING THE CAMERA GT
Taking it out to play
4. KNOWN ISSUES / BUGS
Some existing issues we are aware of and are working on.
5. WHATS UPDATED IN VERSION 1.1
Good for existing owners to get a summary of the updates in version 1.1
===================================
1. WHERE IS MY CAMERA GT?
===================================
This keystand is the delivery package for the Camera GT. Think of it as a fancy (but intelligent) box.
Note that the keystand self-deletes in 2 minutes when rezzed in-world - this is to clean up (explained later). But thats not an issue, you can just rez (drag out) a new copy if you like.
===================================
2. WHY A KEYSTAND AND WHATS SO INTELLIGENT ABOUT IT
===================================
The keystand not only makes a good and elegant packing box to deliver all the items in, it has its own functionality built in, and using it correctly offers these features :
* By rezzing the keystand first, the Camera GT will load faster : the keystand prepares the nearby users SL clients to load the Camera faster. A good approach is to rez (create) the keystand then tell others your Camera comes with this cool keystand. While you are chatting, the keystand is preparing their clients for the car to be rezzed faster / better.
* The keystand self-deletes after 2 minutes. This is to be sure it cleans itself up in case you forget you rezzed it.
* By default the keystand will automatically rez (create) a Camera GT when it self-deletes. This can be disabled by clicking it and selecting "Disable" in the menu (You can later "enable" this option again : doing so starts a 2 minute countdown). In case you have rezzed your own in the meantime, that Camera will also self-delete in 2 minutes (vehicle self-delete may not work in intial releases), unless you (the owner) touch it. So if you want to use it, just click on it at some point after it rezzes. Once you've done that, it will stay rezzed (unless the sim you rez in returns it based on auto-return rules etc).
* If you don't want to wait 2 minutes, you can click the keystand and select "Camera NOW" from the menu. Then the keystand will be replaced by the Camera GT.
* It's a neat keystand and good for bragging rights :)
===================================
3. UNPACKING THE CAMERA GT
===================================
To unpack / rez your Camera GT you can simply click the keystand, and select "Camera NOW" from the menu. Or wait 2 minutes (see above) for the keystand to rez it for you. Or you can drag it from the contents of the keystand - to do so, right-click the keystand and select "Open", then simply drag the Camera GT out onto the ground to rez it.
Do the same with the HUD. You can get a HUD by clicking the "Get HUD" button. When the HUD is rezzed (created) it will ask you if you'd like to wear it, you should select yes if you want to drive now, but can select no if you want to copy it to your inventory then take a copy - it'll ask you next time you drag it out, so no problem.
If you just want to drive the Camera GT then you can just drive now (see Release Notes of Camera GT for help on driving / options etc).
You don't need to keep a separate copy of the Camera GT in your inventory, but if you want to, you can simply right click on it and select 'Take Copy'. The same for the HUD.
===================================
4. KNOWN ISSUES / BUGS
===================================
As with any release, there is always the possibility of a few minor bugs.
As of release there is no real outstanding bugs we are aware of, so hopefully we got them all. Some of the uncommon issues we have experienced which you may experience are :
- We had one script crash. It may have been sim related as we could not reproduce it. In any case if that ever happens, the car that gives the error will be undriveable. The solution is simple - just rez a new one and enjoy.
- The new camera function in release 1.1 can be a little 'sticky' (not switching to the preferred type). If it happens just try click on the SL background and try again, or try zoom around : it seems to be caused by a SL bug with focus, but luckily not a big issue.
Updates are free, so as soon as we release updates with any bug fixes, or ongoing enhancements should we make any, you will get them automatically - you will get a blue message that an update has been sent, which you should accept. Once you have received a new update and have checked its all working ok, you should delete the older version ... else you may end up rezzing them again - which will prompt you for another update.
===================================
5. WHATS UPDATED IN VERSION 1.1
===================================
Version 1.1 is a big release for me, as it takes the car to what I originally envisioned, and out of the pre-release category. There are still one or two things I'll prob add, the more detail prim for example - actually I have 6 prims available now, as with this release we have shed off 4 prims making it even lighter ;)
In celebration of the color module, the car will be delivered in a bright lime/yellow color (so wear your shades before rezzing) - hopefully making other car owners green with envy :)) Additionally upon unpacking it has some further customized parts that you can only get back by rezzing a new car from the package (ie not avail via the options) - this is a (CF) carbon fibre bonnet and rear wing, and a special set of black alloys. These were added after I completed the configurator so I left them in as "additional toys".
Also - many users don't use the light beams and real-damage (which gets disabled using FX button), but as FX button also disables some tyre-smoke, I set the default car when rezzed to appear to have FX on (on the HUD button) but light beams and damage is OFF while tyre smoke is on. If you want, just toggle the FX button on HUD to revert to normal behaviour. As with (CF) options above if you toggle the FX button, the only way to get these settings back as its delivered is to re-rez a car from the package.
The following is a summary of what has been added in version 1.1 :
a. COLOR / TINT CONFIGURATOR
This is a biggie and I know most customers have been dying to get their hands on it, and I'm looking forward to seeing you all put my sweating to good use and color the grid :) The color module has the following features:
(Help is avaiable online at http://sl-carreragt.blogspot.com/2008/05/assistance-for-color-tint-configuration.html)
- Colors can be applied to all body panels, or individually to specific panels (eg doors only) ... so you can make patchwork cars :)
- 4 base colors to start with - these are White, Silver, Red, Charcoal. You should chose a base color close to your desired color, then 'tint' it to get your exact color.
- Full RGB tinting over the base colors means almost unlimited colors can be mixed. As the tumblers are slow to cycle through 255 tints for each of Red, Green, Blue, I added a quick tint option - click on the Tint preview color (big square) and select a tint from the menu close to what you want, then just adjust the RGB values to the exact match.
- Shine options ...for the blingers :) Although you can apply shine using this and make chrome cars I don't suggest shine with sculpts as it enhances the bumpiness of SL sculpts rezzing issues. I suggest either 'No Shine' (matt) or 'Low Shine' if you must. Also not that SL currently doesn't render shine on textures with any transparency - so you'll see the engine hood and windscreen prims won't get any shine. You can try adjust them manually with a tint to get them 'close'.
- Wheels Wheels ... Firstly, the wheels on the new update are different in shape and you can now see brake detail. But apart from that I also added 2 additional custom rims you can select (and another black alloy set as delivered - but not avail in configurator though). To change wheels, select 'Alloy Rims' fromt the panel selector, then select from the Custom options. Wheels are tintable too but shiny does not apply as they have transparency (SL issue).
- Interior options. I have added the ability to change the interior, so you now have the original brown leather, a black interior, and a silver interior (all tintable too). To change interior, select 'Interior' fromt the panel selector, then select from the custom options.
b. PERFORMANCE UPDATE
All the code has been rewritten and optimized. The car is more responsive and I believe handles better. I have heard from many racers they'd like a bit more speed too, so I've added a little more power. However I must state i find some cars rediculous wrt to speed - its like missiles - I saw a vespa motorbike on a track at about 400mph. The point is one can do anything using script - i can script a car to follow a path or drive itself and you can get 5 sec lap times, or have unreal ground-hugging abilities, but its rediculous and looks rediculous. The most fun I still have with this car is in drift mode sliding all over - not too fast (not drift + race). I have tried hard to keep this car realistic and that pertains to performace too. However I have added some options for others who prefer a bit too much :
- Overall performance. As noted above overall performance has improved, I added some extra power, and steering should be more responsive. I added some groundforce effects but nothing rediculous.
- Steering update. The original release had 'Adaptive Steering' meaning the steering response reduces with speed (proportionally) so a turn on a high-speed straight doesn't put the car sideways. To improve that I've now added 'Nudge Steering' too so the first touch on the steering will be slight ... good for high-speed slight directional changes.
- Detuned drive mode. The normal drive mode is a little more relaxed now. If you want performance click RACE on the HUD.
c. TWEAKING OPTIONS
Apart from the fixed performance updates mentioned above, I have added options to allow users to 'Tweak' the car to their preference. Tweak options are available from the HUD tweak button, or by clicking on the windscreen.
Tweakable options are :
- Power. You can override the power by factors of (0.4x, 0.6x, 0.8x, 0.9x) which are all to reduce the power for the more relaxed folks, or increase the power by factors of (1.1x, 1.2x, 1.4x, 1.6x).
- Braking. You can override the braking by the same factors as Power above.
- Steering. You can override the steering ratio by the same factors as Power above.
- Seat Position!!! :)) You can now set your preferred seat position closer to the steering or further.
d. CAMERA OPTIONS
I have added scripted camera modes to the car. As driver, you can now choose from 3 camera options :
- DEFAULT camera : This is the old camera where it's fixed at a position above and behind the car.
- DRIVE camera : This camera follows the car simialr to the default but is not fixed so it floats smoothly behind the car. Accelerating (up in gears) will move the car further away from the camera. It should be loaded as the startup camera when you rez a new car.
- WORM camera : more for fun factor but a little tricky to drive with. Its similar to the Drive camera but closes down shortest distance to car, so if the car is a distance away from the camera and turns sharply, the worm camera won't exactly follow but shortcut directly to the car.
- Off course for the real FEARLESS drivers there is MOUSEVIEW driving ! :)) Just type 'M' on your keyboard, move your mouse so you are looking ahead, and pump through the gears for GREAT fun :)) My personal favorite is Mouseview with DRIFT enabled and the sound turned up ;)
There is also a camera DIST (distance) function which allows you to det the camera Far, Normal, and Close. However in the scripted camera modes you can sometimes use the mouse scroll-wheel to set the distance. It takes a little practice.
e. MORE REALISM
In an effort to add even more realism to this model, the disk brakes now have a temperature function and will heat up with heavy use. You will visibly see that in their level of glow. There is no performance impact on the braking though its just for visuals. They will cool down with lighter / no use too. I never went to the level of scripting additional SL wind cooling effect in :)
f. HUD CHANGES
HUD buttons have changed quite a bit - see the online guide at http://sl-carreragt.blogspot.com/2008/04/carrera-gt-hud-release-notes.html. The Color button opens the Color / Tint Configuration applet which is implemented as a second HUD (so you will need to allow it to attach when prompted). This is to save the unneccessary overhead of dragging it with you if it was part of the main HUD.
g. PASSENGER EJECT
I have re-enabled the passenger eject option. So when an uninvited person just seats themselves in your car - assuming you don't want their company - you can simply click on the seat and select the menu option to eject the passenger.
h. LESS PRIMS!
This update actually reduces the cars prim count from 29 to only 25 prims!!! How light is that ! :))
i. SOUND UPDATE
- The sound in Reverse, 1st and 2nd gear has been detoned to a growl. A new sound has been introduced and you'll hear when changing from gear 2 to 3 which is quite fun as it ups the tempo to the full race sound in 3rd, 4th, and 5th ... you might want to try that in MOUSEVIEW driving mode with sound turned up ;)
- General repairs to the sound system have been made, and its pretty robust now with very little sound errors.
f. OTHER DETAILS
- Different wheels now with disk brake detail
- Locks now working. Clicking LOCK on the HUD will lock the car som no-one can open doors etc while you drive.
- Chill mode has been removed. It was found to be mostly just in the way and not used much. It was also causing slight lag on the scripts. Originally I wanted it to display full 3D Alloys, but with all the new Alloy wheels that won't work as they'd only have been in the original design.
- New textures : Some of the body textures have been replaced to make slight changes. Examples are the front light units, and textures with some subtle re-labelling to not mess with the genuine cars trademarks.
Updates are free, so as soon as we release updates with bug fixes, as well as ongoing enhancements, you will get them automatically - you will get a blue message that an update has been sent, which you should accept. Once you have received a new update and have checked its all working ok, you should delete the older version ... else you may end up rezzing them again - which will prompt you for another update.
Enjoy :)
Monday 4 February 2008
Error : Color Configurator HUD not attaching...
If this web page is automatically loading then possibly you are having a problem with the "HUD - Color Configurator" of your vehicle.
The problem is most likely caused as the Color Configurator HUD does not know which vehicle it should color (remember there may be multiple of the same vehicles around you). The only way it knows this for sure is it needs to be 'told' by the driving HUD.
For that reason the "HUD - Color Configurator" will only load correctly when it is loaded from the driving HUD using the "CFG.." button AND that driving HUD is successfully synched (synchronized) with a vehicle - for that to be true you should be sitting in the vehicle as driver.
The owner may be getting an in-world chat message similar to the following (Follow the steps to correct this issue) :
_________________________________________________
You cannot attach the Color Configurator HUD
directly to yourself from your inventory. Also
in order for it to work you need to have your
driving HUD synched to a car.
You need to :
1) Attach the Driving HUD to yourself
2) Sit in the car you wish to configure
3) Make sure the driving HUD has synched
4) Click the 'CFG..' button on the driving HUD
If the Driving HUD is not correctly synched to a
car, you will get this message too.
_________________________________________________
Enjoy :)
Subscribe to:
Posts (Atom)